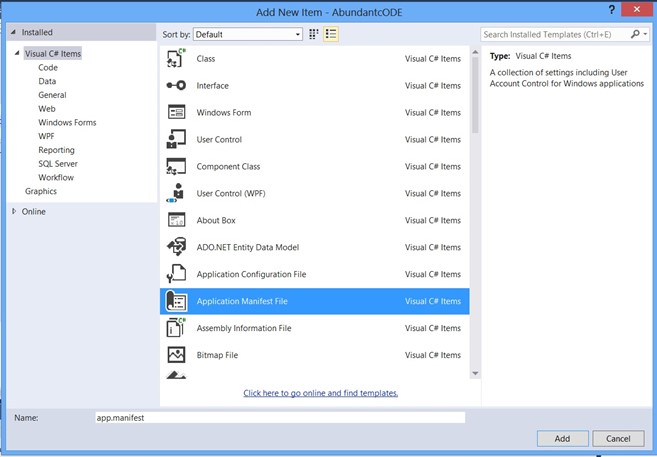
The Winforms or the Console Application developed in .NET can be made to run in the Administrator mode once the application is installed on client machine. You can do this by setting the requestedExecutionLevel to the requireAdministrator mode in the application manifest file.
How to force the .NET Winforms Application to run as Administrator in Windows 8 ?
To force the .NET Winforms app to run in administrator mode in windows 8, follow the below steps.
1. In the Project, Right click on the solution and click “Add new Item” and then add a new Application Manifest file.
2. In the Application Manifest File, modify the <requestedExecutionLevel> to <requestedExecutionLevel level=”requireAdministrator” uiAccess=”false” />
3. You are done. When the user starts the application, he will prompted with the UAC and on accepting the program will run the admini mode.
Below is a sample Application Manifest file.
<?xml version="1.0" encoding="utf-8"?>

<asmv1:assembly manifestVersion="1.0" xmlns="urn:schemas-microsoft-com:asm.v1" xmlns:asmv1="urn:schemas-microsoft-com:asm.v1" xmlns:asmv2="urn:schemas-microsoft-com:asm.v2" xmlns:xsi="http://www.w3.org/2001/XMLSchema-instance">

<assemblyIdentity version="1.0.0.0" name="MyApplication.app"/>

<trustInfo xmlns="urn:schemas-microsoft-com:asm.v2">

<security>

<requestedPrivileges xmlns="urn:schemas-microsoft-com:asm.v3">

<!-- UAC Manifest Options

If you want to change the Windows User Account Control level replace the

requestedExecutionLevel node with one of the following.

<requestedExecutionLevel level="asInvoker" uiAccess="false" />

<requestedExecutionLevel level="requireAdministrator" uiAccess="false" />

<requestedExecutionLevel level="highestAvailable" uiAccess="false" />

Specifying requestedExecutionLevel node will disable file and registry virtualization.

If you want to utilize File and Registry Virtualization for backward

compatibility then delete the requestedExecutionLevel node.

-->

<requestedExecutionLevel level="requireAdministrator" uiAccess="false" />

</requestedPrivileges>

</security>

</trustInfo>

<compatibility xmlns="urn:schemas-microsoft-com:compatibility.v1">

<application>

<!-- A list of all Windows versions that this application is designed to work with.

Windows will automatically select the most compatible environment.-->

<!-- If your application is designed to work with Windows Vista, uncomment the following supportedOS node-->

<!--<supportedOS Id="{e2011457-1546-43c5-a5fe-008deee3d3f0}"></supportedOS>-->

<!-- If your application is designed to work with Windows 7, uncomment the following supportedOS node-->

<!--<supportedOS Id="{35138b9a-5d96-4fbd-8e2d-a2440225f93a}"/>-->

<!-- If your application is designed to work with Windows 8, uncomment the following supportedOS node-->

<!--<supportedOS Id="{4a2f28e3-53b9-4441-ba9c-d69d4a4a6e38}"></supportedOS>-->

</application>

</compatibility>

<!-- Enable themes for Windows common controls and dialogs (Windows XP and later) -->

<!-- <dependency>

<dependentAssembly>

<assemblyIdentity

type="win32"

name="Microsoft.Windows.Common-Controls"

version="6.0.0.0"

processorArchitecture="*"

publicKeyToken="6595b64144ccf1df"

language="*"

/>

</dependentAssembly>

</dependency>-->

</asmv1:assembly>

Leave a Reply