This blog post will explain on how to create a Simple ASP.NET Web API using Microsoft Visual Studio 2015 and return an expose a List (Eg: List<Students>) over HTTP. This includes creating action methods and using them for get all students and get a particular student by id.
How to create a Web API in Visual Studio 2015 and return a List over HTTP?
Follow the below steps to create a WebAPI in ASP.NET and return a list.
1. Launch Visual Studio 2015 and create a new ASP.NET Web Application from the New project template wizard as shown below.
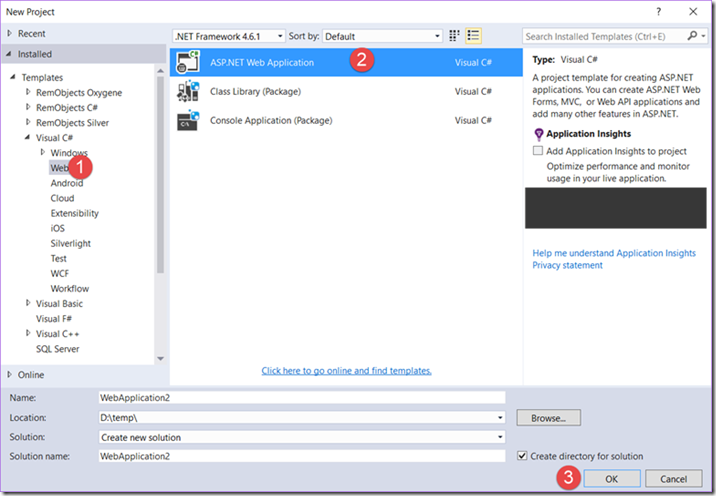
Select “Web” from he Installed templates under” Visual C#” in the left sidebar and then select “ASP.NET Web Application” from the content pane and click OK.
2. Select the Web API template and click OK. Also, uncheck the “Add unit tests” checkbox. Note that when you selected “Web API” under ASP.NET 4.6.1 templates, MVC and Web API check boxes are selected under the “Add folders and core references for” section.
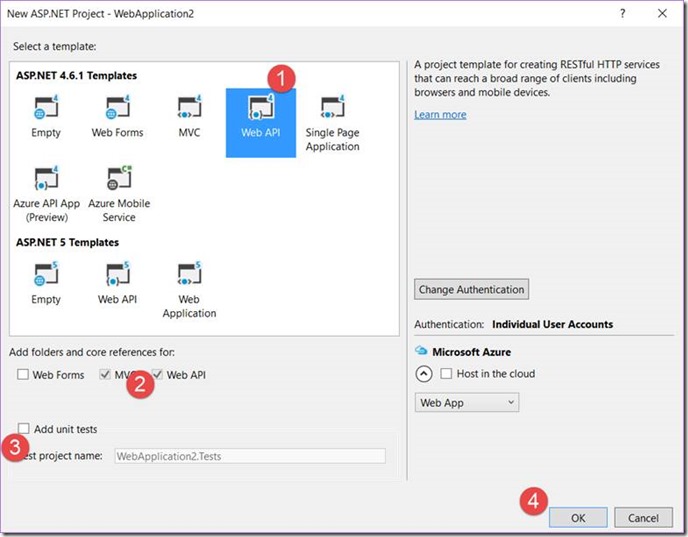
3. This would create the WebAPI project with the necessary folder structure following the MVC standards (conventions).
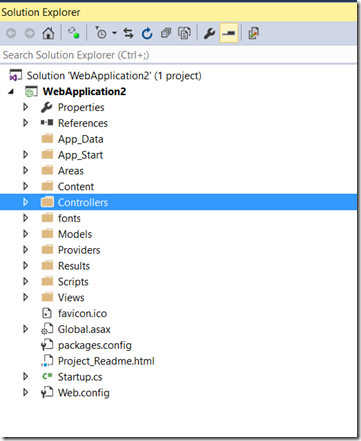
4. Right Click on the Controllers folder in Visual Studio Solution explorer and select Add -> Controller from the context menu.
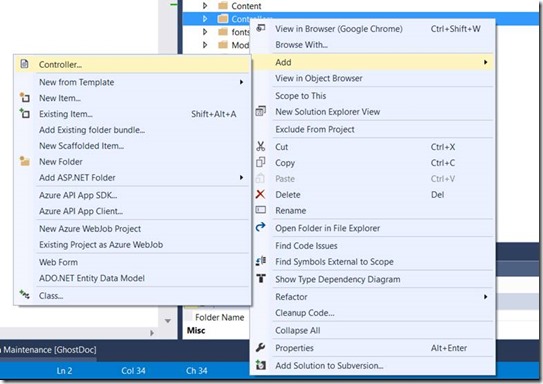
5. In the Add Scaffold dialog window, select “Web API 2 Controller – Empty” template and click “Add button”.
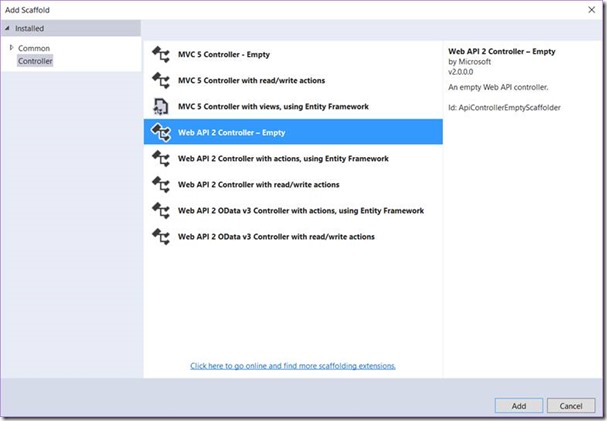
6. In the Add Controller dialog, specify the name of the controller as “StudentsController” and click “Add” button.
7. This will create a new class called “StudentsController” under the Controller folder. Note the class “StudentsController”, it inherits from ApiController which is part of the ASP.NET Web API.
public class StudentsController : ApiController
{

}
8. The next step for us is to create a Model. Just right click on the “Models folder” in Visual Studio solution explorer and select Add-> Class to add a new class.
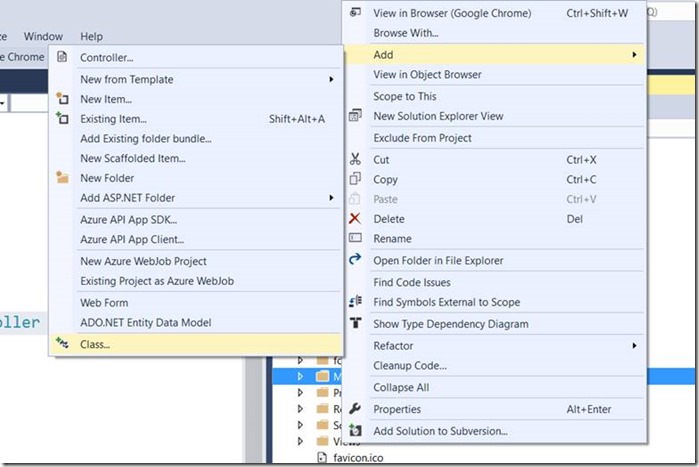
9. Let’s name the class as “Student” in the Add New Item Dialog window.
10. Add the code shown below to the Student class
public class Student
{
    public int Id { get; set; }
    public string FirstName { get; set; }
    public string LastName { get; set; }
}
11. Open the StudentsController class under the Controller folder and create a static field to hold the list of students. Add the it to the Controller StudentsController as shown below.
public class StudentsController : ApiController
{

    private static List<Student> _students = new List<Student>()

    {

        new Student() {Id = 1, FirstName = "Ajith", LastName = "Kumar"},

        new Student() {Id = 2, FirstName = "Vijay", LastName = "Joseph"},

        new Student() {Id = 3, FirstName = "Ramesh", LastName = "V"}

    };

}
Note that the students list (_student) is filled with 3 records. Also, ensure that the namespace of the Employee class is added to the StudentsController using the “using” directive.
12. Now , lets add action methods to perform retrieve all students and a particular student’s records by id using the GET method. We should follow the naming convention of ASP.NET WebAPI and hence use the name as shown below for the action methods (Get).
// GET api/Students
public IEnumerable<Student> Get()
{
    return _students;
}

// GET api/Students/1 to get the student with id of 1
public Student Get(int id)
{
    return _students.First(e => e.Id == id);
}
The complete controller code looks like the one shown below.
using System;
using System.Collections.Generic;
using System.Linq;
using System.Net;
using System.Net.Http;
using System.Web.Http;
using WebApplication2.Models;

namespace WebApplication2.Controllers
{
    public class StudentsController : ApiController
    {
        private static List<Student> _students = new List<Student>()
        {
            new Student() {Id = 1, FirstName = "Ajith", LastName = "Kumar"},
            new Student() {Id = 2, FirstName = "Vijay", LastName = "Joseph"},
            new Student() {Id = 3, FirstName = "Ramesh", LastName = "V"}
        };
        // GET api/Students
        public IEnumerable<Student> Get()
        {
            return _students;
        }

        // GET api/Students/1 to get the student with id of 1
        public Student Get(int id)
        {
            return _students.First(e => e.Id == id);
        }
    }
}
13. Now, build the project in Visual Studio and run it with the shortcut key “F5”, the default browser should open up the URL http://localhost:<PortNo that is configured>. Your project might use a different port number. You might want to replace it the actual port number that your application runs on. In the address bar, type the URL http://localhost:<port>/api/students. If you are using Google Chrome or Microsoft Edge, you will see the Json data displayed on the browser immediately. If you are using Internet explorer, you will be prompted to open or save the file. In this case, just select “Open” and Notepad will display Json data.
[
  {
    "Id": 1,
    "FirstName": "Ajith",
    "LastName": "Kumar"
  },
  {
    "Id": 2,
    "FirstName": "Vijay",
    "LastName": "Joseph"
  },
  {
    "Id": 3,
    "FirstName": "Ramesh",
    "LastName": "V"
  }
]
You can get the details of a specific student by specifying the id as one of the parameter as shown in the below format
http://localhost:<port no>/api/students/1
In this case , you will get the JSON output as shown below for student with id = 1
{"Id":1,"FirstName":"Ajith","LastName":"Kumar"}
Leave a Reply